
Git Installation & Setup Guide
A step-by-step checklist that takes you from a blank machine to your first push on GitHub. Pick your OS once; every step below follows it.
I want to improve this guide and would love to watch how you follow it. If you’re up for a 30–45 minute 1-on-1 session walking through it together, book a slot — your feedback goes straight into making this better for everyone.
This guide is for beginners who want to write code on Windows 11 or macOS. Each step ends with a Done box — tick it as you go, and your progress is remembered on this device.
Our recommended setup
This guide is opinionated — the choices are made for you so you can focus on learning.
| Choice | Recommendation |
|---|---|
| Terminal | The one built into VS Code (or forks like Cursor, Windsurf, Antigravity) |
| Shell | Git Bash on Windows; your default shell is fine on macOS/Linux |
| Git commands | Don’t memorize them — use a GUI client like GitHub Desktop for daily work |
| Authentication | SSH keys (no passphrase, for simplicity) |
| Commit email | Your GitHub “noreply” email, to keep your real address private |
| Git hosting | GitHub.com |
Why these choices?
- A terminal inside your editor. Most people learn Git because they’re also learning to code. The terminal in VS Code (or a VS Code-like editor) keeps both in one window.
- Git Bash over PowerShell on Windows. The commands you learn (
ls,rm,ssh-add,cat) also work on macOS, Linux servers, and WSL — PowerShell cmdlets don’t transfer. - GUI clients. Muscle memory for CLI commands comes later. A GUI (graphical user interface — buttons and menus) reduces errors while you’re learning the concepts.
- SSH with no passphrase. SSH is more secure than HTTPS, and skipping the passphrase keeps setup simple. You can add one later.
- Noreply email. Your email is visible in every commit’s metadata. GitHub gives you
a private
@users.noreply.github.comaddress to protect your inbox.
Step 1: Open your terminal
We recommend VS Code or Antigravity as your editor — both have a terminal built in.
1. Install VS Code (if you haven’t already)
Windows: which version? (x64 vs ARM)
Most PCs use x64. A Surface Pro X or Snapdragon laptop may be ARM64.
- Press the
Winkey, type “About your PC”, and hit Enter. - Look for System type.
- Download the matching installer.
2. Open the terminal
Press Cmd+` / Ctrl+` to open the integrated terminal — or use the top menu: Terminal → New Terminal.
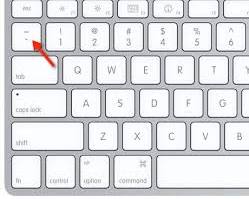
Where is the backtick (`) key?
It’s usually above the Tab key and below Esc.
Click the trash-can icon in the top-right corner of the terminal panel, then open a new one.
1. Install Antigravity (if you haven’t already)
Windows: which version? (x64 vs ARM)
Most PCs use x64. A Surface Pro X or Snapdragon laptop may be ARM64.
- Press the
Winkey, type “About your PC”, and hit Enter. - Look for System type.
- Download the matching installer.
2. Open the terminal
Press Cmd+` / Ctrl+` to open the integrated terminal — or use the top menu: Terminal → New Terminal.
Where is the backtick (`) key?
It’s usually above the Tab key and below Esc.
Click the trash-can icon in the top-right corner of the terminal panel, then open a new one.
- macOS: open Terminal (Applications → Utilities).
- Windows: open Git Bash (installed with Git in Step 3).
Step 2: Get a GitHub account
Already have one? Skip to Step 3. Otherwise:
- Go to github.com/signup.
- Enter your email, create a password, and choose a username.
- Verify your email address.
- (Optional) Turn on two-factor authentication: Settings → Password and authentication → Two-factor authentication.
Step 3: Install Git
Check if Git is already installed
git --version- See a version number (e.g.
git version 2.39.0)? You’re done — skip to Step 4. - Get an error, or a prompt to install? Continue below.
Install Git
The simplest way, with no extra software:
xcode-select --installA popup appears — click Install and wait for it to finish (it can take a few minutes).
Verify the installation
git --versionYou should see something like git version 2.39.0.
Check if Git is already installed
In the terminal in VS Code, run:
git --version- See a version number (e.g.
git version 2.42.0.windows.1)? You’re done — skip to Step 4. - Get an error (e.g.
'git' is not recognized)? Continue below.
Install Git
- Download the installer from git-scm.com/download/win.
- Run it. These settings are the ones that matter:
- Git Bash Here — adds a right-click menu entry
- Use Git from Windows Terminal — so
gitworks in PowerShell too - Use bundled OpenSSH — for SSH key support
The defaults are fine for most people — just click Next through the installer.
Verify the installation
Open a new terminal window (important!) and run:
git --versionYou should see something like git version 2.42.0.windows.1.
Close and reopen your terminal. The PATH only updates for new terminal sessions.
Step 4: Pick a GUI client
A GUI (graphical) client is easier than the command line when you’re starting out. Pick one:
A visual Git client that’s perfect for beginners — and completely free.
-
Download it from desktop.github.com/download.
-
Install and open the app.
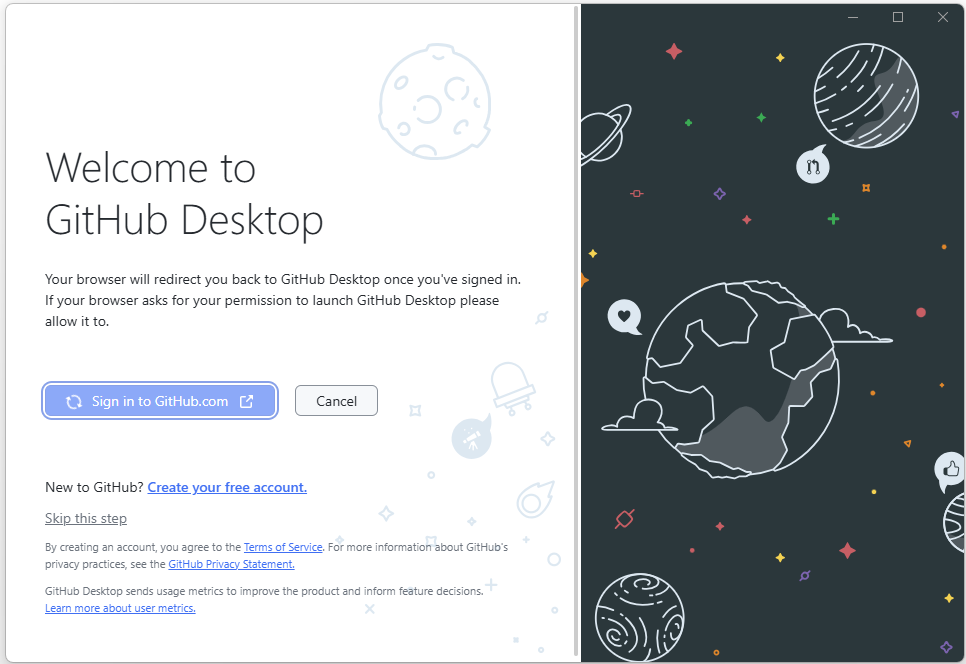
-
Click Sign in to GitHub.com.
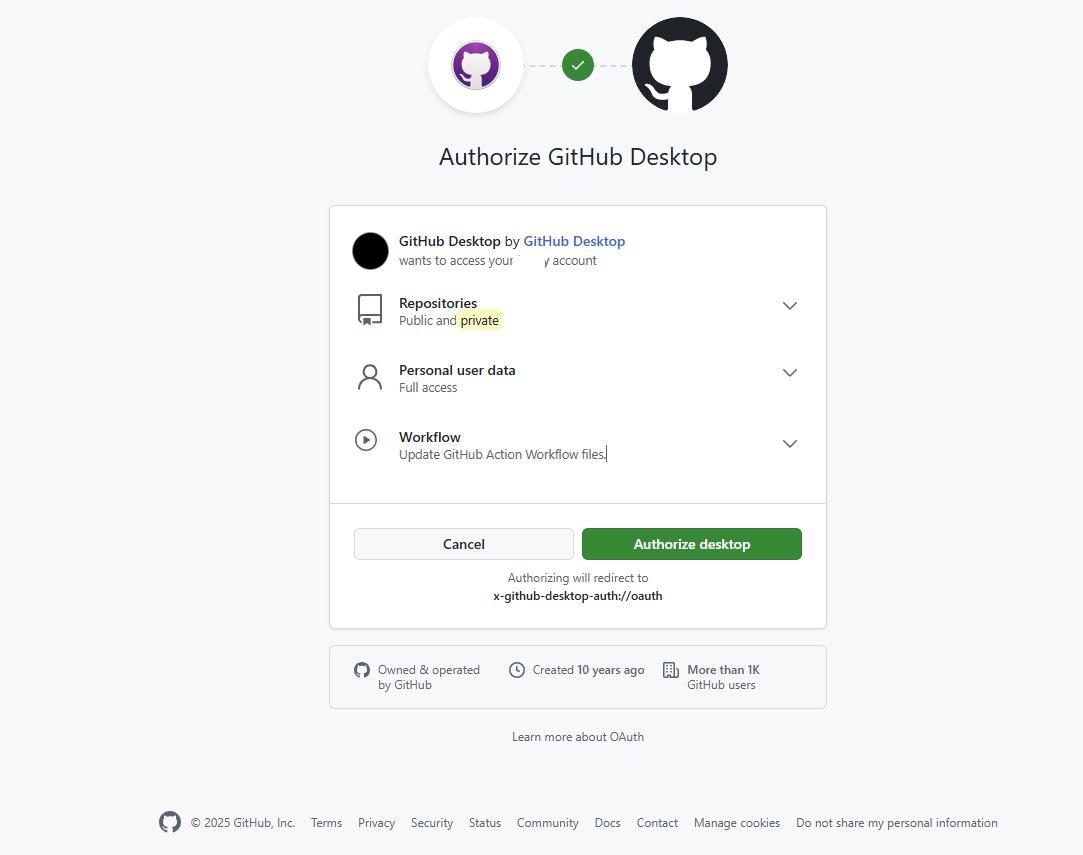
-
Authorize GitHub Desktop in your browser.
Show the authorization screen
No command line needed, you see visual diffs before committing, and it’s built by GitHub, so it integrates seamlessly.
A powerful Git client for professionals — $69/year, or free for students at git-tower.com/students.
- Download it from git-tower.com.
- Install and open the app.
- Go to Tower → Settings → Services.
- Click Add Account and sign in to GitHub.
A visual interactive-rebase UI, great multi-repository management, and strong conflict-resolution tools.
That’s fine too. The rest of this guide shows CLI commands, which work with or without a GUI client.
Step 5: Set up an SSH key
An SSH key lets you connect to GitHub securely without typing your password every time.
5a. Check for existing keys
In your terminal, run:
ls -la ~/.sshLook for files named id_ed25519 or id_rsa (and their .pub partners).
- Found keys? You can reuse one — skip to 5c. Add your SSH key to GitHub.
- No keys, or want a fresh one? Continue to 5b.
Nothing extra on macOS — ~/.ssh is a hidden folder in your home directory.
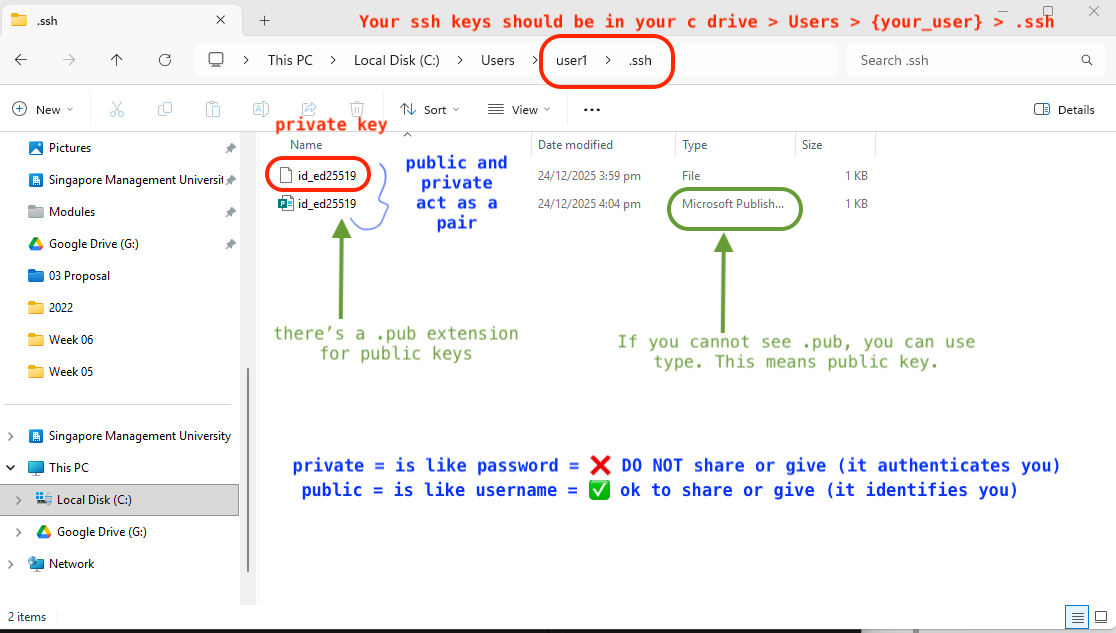
Where are these keys stored? What’s a public key?
By default your SSH keys live in a hidden folder called .ssh inside your user
directory. In File Explorer, that’s C:\Users\YourName\.ssh.
5b. Create a new SSH key
-
In your terminal, run:
ssh-keygen -t ed25519 -C "[email protected]" -
Press Enter to accept the default file location.
-
Press Enter when asked for a passphrase — twice, to confirm an empty one.
Passphrases (optional)
You can add a passphrase for extra security, but it’s beyond the scope of this guide, which gets beginners started quickly.
-
Start the SSH agent:
eval "$(ssh-agent -s)" -
Add your key to the agent:
ssh-add ~/.ssh/id_ed25519 -
Copy your public key:
pbcopy < ~/.ssh/id_ed25519.pubYour public key is now on your clipboard.
-
Open Git Bash and run:
ssh-keygen -t ed25519 -C "[email protected]" -
Press Enter to accept the default file location.
-
Press Enter when asked for a passphrase — twice, to confirm an empty one.
Passphrases (optional)
You can add a passphrase for extra security, but it’s beyond the scope of this guide, which gets beginners started quickly.
-
Start the SSH agent:
eval "$(ssh-agent -s)" -
Add your key to the agent:
ssh-add ~/.ssh/id_ed25519 -
Copy your public key:
clip < ~/.ssh/id_ed25519.pubYour public key is now on your clipboard.
5c. Add your SSH key to GitHub
- Go to github.com/settings/keys.
- Click New SSH key.
- Give it a Title (e.g. “My MacBook” or “Work Laptop”).
- Paste your public key into the Key field.
- Click Add SSH key.
Test the connection:
ssh -T [email protected]The first time, you’ll be asked to verify GitHub’s fingerprint. Type yes and press
Enter.
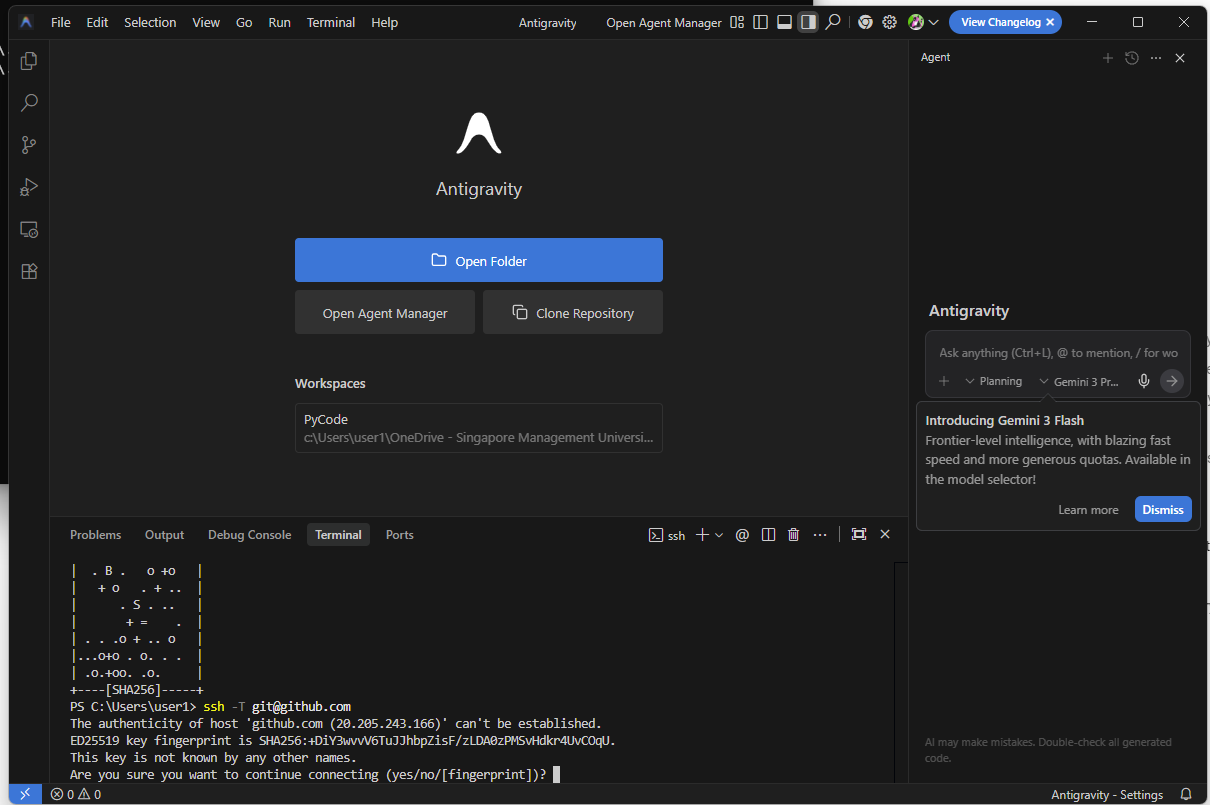
You should see:
Hi username! You've successfully authenticated, but GitHub does not provide shell access.That means it worked — on to Step 6.
Step 6: Tell Git who you are
Use the same email as your GitHub account — or better, your GitHub noreply address from github.com/settings/emails:
git config --global user.name "Your Name"
git config --global user.email "[email protected]"
Check your settings:
git config --global --list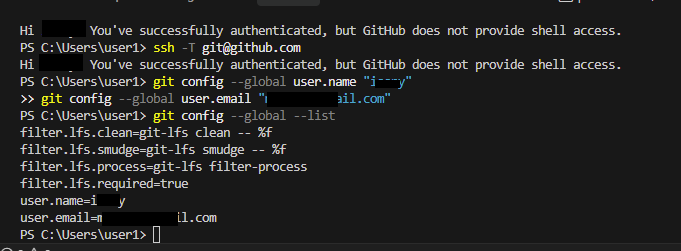
Leave out --global to set the identity for one repository only.
Step 7: Your first repository
Don’t have a repository yet? On GitHub, click + → New repository, give it a name, tick Add a README file (so there’s something to clone), and choose Public — that way the verify button at the end can see your first commit.
Clone a repository
git clone [email protected]:username/repository.gitOn GitHub, click the green Code button → SSH → copy the URL.
Make your first commit
cd repository
# make changes to some files...
git add .
git commit -m "Your commit message"
git push
Clone a repository
- Open GitHub Desktop.
- File → Clone Repository (Cmd+Shift+O / Ctrl+Shift+O).
- Select the GitHub.com tab.
- Choose a repository from your list (or paste a URL).
- Click Clone.
Make your first commit
- Change some files in your editor.
- In GitHub Desktop, the changed files appear in the left panel.
- Write a Summary (your commit message) at the bottom.
- Click Commit to main.
- Click Push origin to upload.
Clone a repository
- Open Git Tower.
- File → Clone (Cmd+Shift+C / Ctrl+Shift+C).
- Paste the repository URL.
- Choose where to save it.
- Click Clone.
Make your first commit
- Change some files in your editor.
- In Tower, open the Working Copy view.
- Stage files by clicking the + button.
- Enter a commit message and click Commit.
- Click Push to upload.
Be descriptive: “Fix login button alignment” beats “fix bug”.
Quick reference
| Command | What it does |
|---|---|
git status | See which files have changed |
git add . | Stage all changes |
git commit -m "message" | Save the staged changes |
git push | Upload commits to GitHub |
git pull | Download the latest from GitHub |
git log --oneline | View commit history |
git branch | List branches |
git checkout -b name | Create and switch to a new branch |
Checklist
Everything you ticked along the way, in one place. Jump back to any step with ↑.
Verify my setup
Rather not take your own word for it? Enter your GitHub username and the page asks GitHub directly: does the account exist, does it have an SSH key, and is there a commit by you? Each one it can confirm gets ticked above and marked verified.
Reads public GitHub data only, straight from your browser. Private repos stay invisible to it.